If you've somehow stumbled in here from some really good internet party and are trying desperately to find your pants a few background things. I like Halloween, more the prop making less the dressing up part.
I'm also a member of a Halloween club that was born of taking a halloween prop making class.
Halloween!
Okay, now that we've gotten that out of the way and you've trousered up we can move on to the tutorial as it were.
Out of all the weird and wacky ideas out there (corpsing, buckys, spray insulation foam!) making your own Halloween tombstone is perhaps the most popular and also easiest.
All you need is some thick foam from the Hardware store or conversely you can rip it out of the walls of that abandoned house that screams at night. I'm sure it won't in any way be haunted.
Designs are hard, that's why I outsource trolling google image of ancient looking tombstones. Steal some of their better ideas and then combine them all together.
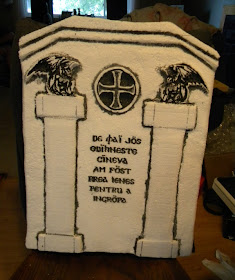
It's actually not that hard, just print off your choice of monster to etch into the stone and with an exacto knife slice out the tiny sections of stone that you want indented.
To help raise out the pillars and gargoyles I sanded the hell out of my foam. This can get a bit trickier as sandpaper is an equal opportunity destroyer and more than happy to take out the gargoyles as well.
Okay so that's all done, and you also added some layers up top, a cross in the middle and an epitaph in Romanian because you couldn't think of anything poetic and went with "Below Rests Some Guy We Forgot To Bury."
Next step is paint!
Filling in every tiny crevice will drive you mad, but that's okay. You already have a haunted tombstone trying to convince you to kill your entire stack of screws, a bit of extra madness gives new flavor.
I prefer to not use straight up black. I like to cut it down with a bit of gray because full black is too harsh and makes the tombstone look even faker.
The next step is to pull out your gray latex paint and give that tombstone a nice hard surface. I assume everyone has gray latex house paint, right?
I also, using my black paint, water and a bushy brush, dabbled on black to age the stone. This is sort of like a baking technique, you can't explain when it's dough and not just a soupy water/flour mess, you just know.
I'll use a combo of the brush, the water, and a paper towel to wipe away any excess. But I ain't done yet.
Another trick is I like to add brown. Not a lot mind you, and using the same watery brush I did for the black.
Most stone isn't just two colors, it's a veritable rainbow of browns, grays, grayish greens and browny grays.
Finally I reoutlined the edges to give the stone a slightly more theatrical look. I'm not keeping it and most people tend to prefer that look.
Now I just have to paint the other three sides, add in support PVC, oh and create a base. You know, kids stuff.
Next plan is to make a Skyrim tombstone, arrows to the knee are more deadly than previously thought.


No comments:
Post a Comment