Showing posts with label crafting. Show all posts

Sunday, October 5, 2008

Fake pumpkins, in study

I've been talking with a few other brides who are doing a halloween wedding and there has been debate back and forth about what type of fake pumpkin works best for carving and showing off at the wedding.

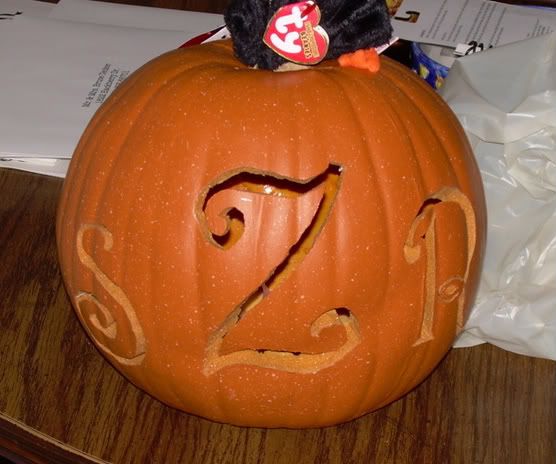
A while back I posted my attempt at doing a very simple monogram on an actual Funkin (The rolls royce of fake pumpkins). Aside from me having a hell of a time getting into the bottom it was really lovely to carve (a lot like a real pumpkin without the guts). It held up well when carving out small bits or having to leave behind small sections for the design.

The funkin is made out of plastic that's then coated in a foam that cuts more like wood and is painted. Because of the paint you do have to be careful in carving as you can chip it off. It also has a nice weight to it so I wouldn't worry too much about a funkin blowing off or getting knock off of something too easily.

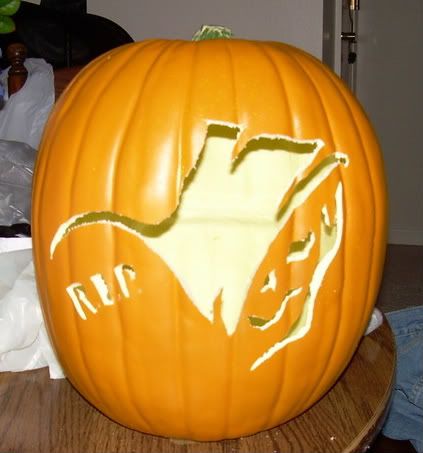
To contrast yesterday I got a knockoff fake pumpkin from Michaels (Sorry I don't know the brand as I cut the tag off before I thought to write it down). This was one I wanted to carve just for home decorations and not for the wedding.

First thought is that the Michaels pumpkin is much cheaper than a real funkin. It does however before doing any carving look more like a real pumpkin than the funkin. It's made of a foam almost rubber type that is very light so I'm worried about putting it outside for any length of time.

Carving it was also extremely difficult. The foam rubber was at first very hard to punch into and I was very worried about the whole thing caving in easily. I'd say that if you have any kind of a detailed pattern planned don't get a foam fake pumpkin. Also the rubber left behind a bunch of fuzzy white bits almost like small pieces of Styrofoam that are hard to get rid of.

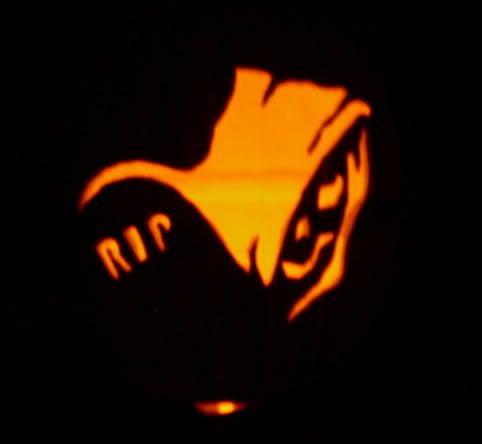
As you can see in the day light picture it is more of a yellow than an orange inside and you can easily see the seam; however, the pumpkin does look really great at night.

In the end, I'd say that if you want to have a realistic looking and carved pumpkin it's best to shell out the extra $5 or so and get a funkin. They are really easy to carve, have a good weight to them, and look almost realistic (I've confused a few of my family).

But if you just want some fake pumpkins that you won't carve or you are only going to have in the almost absolute dark the cheaper Michaels ones work good (but I'd still do my best to avoid any very intricate patterns).

Friday, September 5, 2008

Get yer programs!

I'm a bit surprised at all of you who claim you want to see our programs. I'll level with you, they're quite boring and cheap.

I don't have the best sense for stationary so I didn't go out of my way to make a really fancy booklet or even those little rectangular pieces of cardstock.

We have a whole bunch of people coming who are Catholic and they really need a program as the ceremony is gonna be generally Methodist (but we do have some holy water for them in the back).

To me that was always the point of programs to tell everyone what is coming up next and when to expect the thing to be done. Of course the other half of the program is to announce who helped with this whole shindig and to thank them. I was always used to the simple paper programs that you get at church, at other weddings I attended when I was little and well really anything that happens at the church.

So I went old school (kinda like the cake topper). We picked out some not gag me sappy or ugly paper and then came the hard part, getting it all to print. 
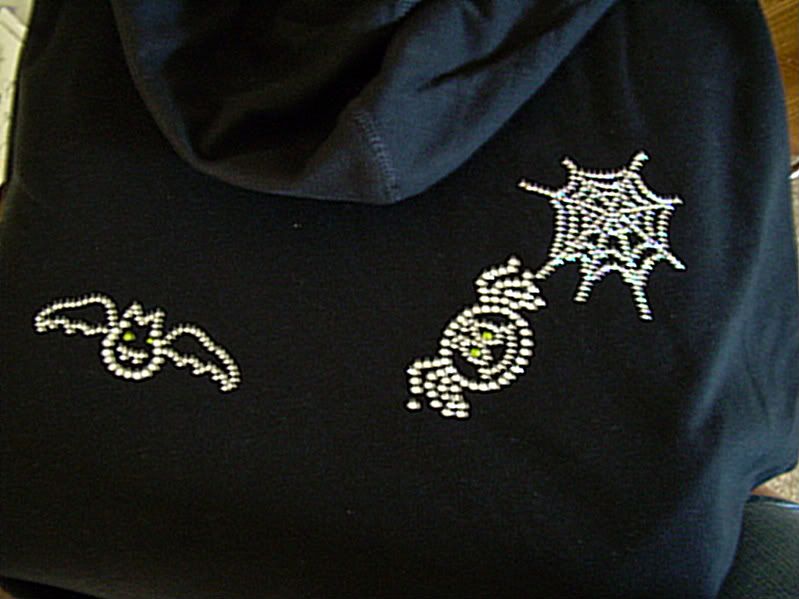
Since making these things were so easy I was thinking I'd share something you don't usually see at most blogs, the order of the ceremony and any other stuff that fills it out. It seems like a lot of people really want a good general idea but it's about impossible to find.

This is of course our Methodist version, but if you're looking for a pretty simple common Christian flow this is about how it goes (Though I did change 'sermon' to 'homily' for the Catholics in the room). There is also some extra stuff at top including a fun border but I cut it off for the sake of um it wouldn't fit in my screen grab.

The other side of the programs have a nice long listing of all the people who helped and anyone we're related to as well as a few simple statments like "If you for some reason forgot the reception starts here at this time" and "Thanks for being here with us, in fact you can take a few extra programs with you if you want. We have a ton left over thanks to all those who ditched."

The back is where it gets a bit interesting. Most people will put a quote or two that is inspiring and all about how great love is. Well we aren't sappy so it's been a difficult challenge trying to find love quotes that don't give me a sugar rush.If you can't read them here's what they say:

“The way to find out if you love someone or not, is by talking to them. The more you talk to them the more you either hate them or love them.”
Brad Breitenstein


We're also both crazy Terry Pratchett fans so I did some digging through some quote databases to find a good one about weddings.


“A marriage is always made up of two people who are prepared to swear that only the other one snores.”
Terry Pratchett
The Fifth Elephant


If you're wondering what that tiny spec of almost invisible text is, it's sort of a hidden Easter Egg for our programs. No it isn't us railing against all those problems and road blocks wedding planning has thrown us. It's another quote, a quote a lot of people at weddings wouldn't want to think about but one that I think holds quite true especially held up to the light of the idea of the wedding being the best day of your life.

"Listen, happy endings is fine if they turn out happy. But you can't make 'em for other people. Like the only way you could make a happy marriage is by cuttin' their heads off as soon as they say 'I do,' yes?"
Granny Weatherwax
Witches Abroad


Sorry to dissapoint if these weren't what you were expecting, but I can only be creative 10 hours out of the week. Court Order.

Monday, September 1, 2008

Card carrying Bride

I thought what better way to celebrate labor day than talking about the most labor intensive project I did this weekend.

I've been meaning and meaning to make a card box. For a while I was thinking of something simple, get a cardboard box and cover it in wrapping paper. But that seemed almost too dull and boring for me (plus there was almost no chance I could cover my skin in some exotic paint color).

After seeing a post about card boxes from Nautical Wedding (who actually linked back to The Pissed off Bride, it's like phone tag with blogs and brides) that are designed to look like wedding cakes (really you should go see them they look really awesome) from that most holy of holy places etsy.com I started to get some ideas.

There was no way that I was going to pay $50 for my own little cardboard cake thing, (plus we aren't going to get that many cards) but my creative wheels started turning and Friday night we made a trip to Big Lots! where I tried to find just the right sized box (we also went to see their Halloween decorations, man people are taking forever to put them out).This is a picture of what I started with. A simple hat box covered in chickens (FYI I loathe chickens, I had to spend a summer dealing with them. They are the most disgusting and vial creatures on earth). I carved a hole into it using the steak knife (a very bad idea).

Most people would probably try turning this a nice weddingy color (like white or maybe blue) not I. Ee went black. Though most of that was because the only spray paint we have is black (from the sign).

So early on Saturday morning I would make trips in and out of our appartment attempting to spray paint this box. It was going pretty well until I ran out halfway and had to go and get some more.

After letting it all dry it was only a matter of sitting down for 4 or so hours and painting on all the pretty little flourishes that are our wedding.Since we're having the blue and green theme for the ceremony one side is painted with green vines and random blue flowers.
And for the reception, which is of course going to be as halloweeny as we can manage, a whole bunch of pumpkins on their own vines.The best part of this little project is that in the end I got a customized card box that only cost me under $10. Just kindly ignore the fact that I spent around 5 hours making it and my forearms are killing me.

If you're also trying to think of a simple but still different card box you could not be as insane as me and just spray paint a hat box your wedding colors and then glue some tulle to it.

Friday, August 22, 2008

Here comes the bride

A long long while back my Future Mother-in-Law had found one of those little rhinestone things that spells "bride" for under a dollar. I really didn't know what to do with it for quite some time (there were thoughts of a GoodWill trip but that got nixed in favor of sanity).


I've never understood those tank tops that say things like Bridesmaid and Maid of Honor. So you can only wear it once and you can't even really wear it while getting ready what with it being a tank top and you don't want to pull something over your head when you have super fancy hair? Seems like a big waste to me.

This weekend when we had to take a stop at Michaels for, um, I really can't remember why now, but while I was trying to hunt down a toddler I saw something that got me thinking on what to do with those little bridey jewels.


I had to make a stop to Target to get myself a nice black hoodie and then drag out the iron.


This is the final product:

I wanted something with either buttons or that zips up so I can easily get into and out of it while having my hair all piled up and nice like, but I'd also want something I can wear again. What with us getting married in October and honeymooning ina not warm place, a cozy hoodie made more sense than getting a button up shirt.

Plus I have an extra spider, so when I get tired of the "bride" I can take it off and put on a cute spider instead. It'll also be something nice to pull out right around halloween every year.


Has anyone else made something a bit different from the ol' "Mrs. Such and such" or even a simple "bride?"

Wednesday, July 30, 2008

Is it Halloween yet?

Now for the last two halloween projects that were attempted (and sort of completed) this weekend.

The first is a pretty standard one for all fallish receptions. We got ourselves a funkin (fake pumpkin for those that are not Hobby Lobby fanatics) and after some hemming and hawing I decided to go the traditional route and carve out our initials.It was pretty easy making the pattern, I just had to look through every single font I had and pick the coolest (and easiest to carve), then I printed it off, taped it to the pumpkin and started carving. (R is the worst, I kept threatening to change my fiance's name to Carl just to make it easier)

About halfway through the 'S' I realized that I really should have carved out the bottom first (as Martha Stewart will tell you it's better than carving from the top for pumpkins so your pumpkin will, um, not show it's scars?) For this funkin though it's very very important that you carve from the bottom and here's why.

As I was starting to saw using our puny little pumpkins saw the paint on the bottom peeled off a bit (would really ruin the effect if done on the top). So thanks to my hand cramping up I switched to our rather fat steak knife to see if that would work better. The knife went in about two times before the entire bottom collapsed in. It was such a shock that my hand went in with it and the funkin cut up the side.

That's right, I got beaten up by a fake pumpkin. Wait til all the other pumpkins hear about this. I'll never live it down.

Luckily the rest of the carving was mostly uneventful, just put a fake tealight in it (real ones would cause a really big fire) and stuck a really cute bat on top.


Our other creation was mostly just something we had wanted to make for ourselves. After finding a really cool skeleton from Oriental Trading we got some fabric from Wal-Mart (a whole nother fun story of waiting behind a guy getting 5 yards of fabric from 20 different bolts). I sewed the fabric onto the skeleton in two layers and after having him pose for a while made a little cowl.
Meet our Death. For a while he was enjoying watching TV in our clam chair, right now he's hanging out on the beanbag.

But to really make it look like Pratchett's DEATH, we had to get some cool blue lights behind his eyes. So began a very misguided plan. There actually are some small strands of christmas lights out at Hobby Lobby (sad, I know) and I changed three of the bulbs from white to blue and removed the rest. Then after some taping and finding holes I got the three up into his skull.
We'll probably still get him all dressed up for the wedding. Maybe give him a masquerade mask and a little hors d'oeuvre to get him into the festivities.

I promise this is the last of the halloween crafts, at least for a while, but if you want to steal any ideas for your own cool haunted house or halloween decorations feel free.

Monday, July 28, 2008

So you don't get lost

I've been a craftin' like crazy this weekend. The by far easiest to make was a sign for the reception. It was an idea that was kicking around in my head and after a lot of computer work, some spray painting, and some glue I came up with this:

I swear the covered up area is my future last name, it's just so rare
that I am a bit scared to share it with the world. That and I think the CIA is on to me.

So this all started after I got it in my head that wouldn't it be cool to have a personalized halloween sign. Thus began a long google search that lead to, well, very little. I did find one website that had quite a few but were a bit pricey. After seeing this one, the idea of having a graveyard or cemetery with our name on it formed into my brain.

The plan all began with a hunt for a cool picture of both a graveyard and then a sign I could alter. I used my mad photoshopping skillz (forgive me, but I just had to type that) to remove the original name on the gate and then added the 'Z' one and cleared off the original background so the one of the graveyard would show up.

After printing the image off on cardstock I aged it in some tea for about 10-20 minutes and dried it off between two towels and with a cutting board on top to keep it from wrinkling. Before it had completely dried I also took my grill lighter and a candle to the edges to burn them up but not enough to light the whole thing on fire.

For the base I got a nice piece of wood and a spray can of varnish in charcoal. I'm sure you can about picture what came next. (But for those I have spray painted with before, I did put down paper this time) After giving it a few coats and letting that dry I took my handy dandy lighter to that and burned off some of the paint around the edges to give it an aged look as well.

To finish it off, all I did was glue it together and then I sprayed a gloss on it all to somewhat waterproof the paper. I still need some bailing twine so we can hang it (I got an insider for that) but otherwise I think it looks super cool and it's something we can use for years to come for every Halloween.

If anyone else wants a graveyard as cool as this, I still have the photoshop template so you can just leave a comment with your last name and an e-mail I can send the completed image too. All the spray painting/lighting/dyeing is up to you.

Tuesday, July 15, 2008

Make your own spooks

This past weekend we did a lot of really boring stuff (like cleaning to make room for when our place explodes with wedding stuff). But one fun thing we did was make our new friend. I like to call him Ghostie (though I call ghost rider the same thing so I'm not very creative).

He was actually my guys project, so it was rather interesting to watch a guy attack a craft project. First stop was Home Depot to get the special glue and paint and give up completely on finding any cheesecloth. The lady checking us out was one of those that just loves to talk and ask everyone what they're gonna do with what they're buying, so my guy sort of mumbled that we're making a ghost and then we made a bee line for the door.My guy tackled the unfun project of attaching two smaller bottles to one large one with some hot glue and then shoving a styrofoam bottle onto it all.
I got the fun job of mixing together the stiffy fabric glue and the glow in the dark paint and then mashing all the cheesecloth into it. It's way more fun getting to make a mess than anything else.
After the cheesecloth had absorbed all the kick ass nutrients from the glues and paints it was time to place it all on the pop bottle model. There was a long debate about how quickly it should be put on before we make a huge drippy mess all over the floors. Alas that didn't work out so well as in the process of debating lots of glue and flashy glowing paint spots got all over.

But after a few days of drying (I eventually cheated and used a hair dryer) and adding some really flashy eyes Ghostie was born. He now sits atop our boxes of wedding presents that have no room to go anywhere and every night I like to charge him up to watch him glow.

Just one more bit of decoration for the reception that we crafted to prove that no matter how crazy we are we're gonna have a Halloween party.

Thursday, June 19, 2008

I only painted my fingers a bit

When we first got engaged my Mother was chomping at the bit to get something done, so I thought it'd be really cool if she could design a cake topper that looked a bit like us. When I was younger she'd always take greenware, shape it, then gloss it and have it fired. I thought that would look really cool, and wouldn't be something we'd have to worry about for months.

So imagine my surprise when she shows up in January toting a gigantic and over the top cake thing complete with tulle and white beads (we have the same issue right now with our unity candle that is probably gonna get re-tooled). At first I figured we could work with it, but then after meeting with our baker to design our cake (more on that later after I make some fun photoshop stuff) and realizing that our cake is going to be more simple and also have some halloween touches there was no way this thing would work.

Instead I went out and got myself a more simple but not too bad topper (Call me old school or tacky but I always kinda liked the bride and groom ones. We don't have any flowers planned at the reception so that wasn't an option and I have a deep hatred of song birds).
But it doesn't really look like us. So I took out my paintbrush, some toothpicks and got to work. The first thing I did was change the pink flowers to blue (pink and I do not get along well), I also changed the color of the brides hair to match mine a bit more and then added glasses to both of them.
Then, after giving the tux a green vest, I got down to the fun stuff. I took some cardstock and rolled it into a cone and glued a bit of the fabric from my tail to it and attached that to the bride. For the groom, using a steady hand, I painted on some Groucho eyebrows and a mustache (no idea how to add a cigar).
I think it turned out really cool. They still don't quite look like us but it sure is a lot closer (and the glasses were insanely hard to do). My friends already think I'm crazy so this should just be another nail in the coffin.

How about the rest of you? You guys doing anything different for a cake topper?

Wednesday, June 11, 2008

And now for something completely different

If you haven't been able to discern from my slight hints about the subject, we're having a halloween reception. And aside from all the candy (our favors) what else makes Halloween the best holiday ever? Why dressing up of course.

We spent a while debating who would wear what and after my Matron of Honor asked if she could wear her wedding dress again I had the idea of famous brides. She's going to be the bride of frankenstein (I've made a hobbit costume with her before, this thing will look just like the original movie) while another bridesmaid will be the bride of dracula. I think my tall flower girl wants to come as the bride of chucky, he he he.

As for me, well I called Bridezilla naturally. We figured I could do it with some really green eyeshadow and a nice long tail. So this past weekend was spent amassing fabric, batting, and some embellishments so I could sew up the tail while my guy killed Dracula (or at least all the various mannequins in Castlevania).

He actually helped to sew the end tail bit, but gave up when the thread kept knotting (thread knots should be blamed on an evil gremlin). We ran out of batting about half way through the stuffing so after visiting Wal Mart to get a new tire (we are cursed when it comes to flat tires) I got the rest and sewed this puppy up.

I'm a bit proud of myself for being able to make something that looks kinda cool all on my little own and no one needed to use spray paint or take a trip to the hair salon. Plus it's nice to have my own little piece to show that yes, we are serious about the costume idea. Yes, it's something we're both really excited about. And yes, just keep it to yourself if you think it's tacky. We really don't care.

Is anyone else doing something out of the box that you're really excited about for your wedding? Possibly a bit too excited.